Wordpress Offline Installation is extremely important for bloggers who do not have internet connection for 24 hours straight, which when needed can be connected directly. With these limitations have, then we really need a wordpress offline that can accommodate all the aspirations of blogging activities. As a means of preparing the post until the experiment materials such as template editing, edit the plugin, until the impromptu projects that I have to do with wordpress. If you want a little effort and a form of computer facilities at home, wordpress offline can easily be owned by exactly the same function compared with wordpress online, only this one will not be seen by people from the outside world.
Initial steps to install wordpress on local host (wordpress offline) is to provide surce we need for the installation process. Namely xampp installer packages and wordpress 2.7.1 (or newer)
Installing XAMPP
After our Wordpress XAMPP and download we begin to enter the installation (note: I happened to do this installation using Intel-based PCs using Windows XP). Open and install xampp installation package, and specify the drive where we will install it
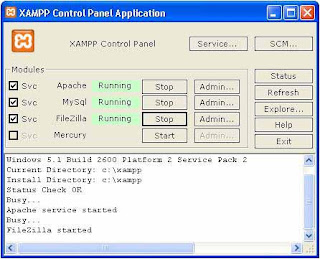
XAMPP Control Panel
After installation is complete proes, then start it is XAMPP. Once XCAMPP run and have open, press the start button to start the Apache and MySQL service (the start of each located right next to peunjuk Apache and MySQL) and wait until the writings of 'Running' turns green.
 Creating Database for WordPress
After we configure our MySQL security settings, so we now can begin to create the MySQL database that will be used for WordPress via PHPMyAdmin interface. Go through the sidebar XAMPP and make a new database, for example below I named the new database with the name of wordpress.
 Installing WordPress
Now we will begin to go to configure our WordPress to the localhost. We begin by making ekstract. Zip file of our Wordpress existing htdocs folder inside the XAMPP folder which we have been installed at the beginning (open using windows explorer). Htdocs folder as public_html function if we use the web hosting server. And we think the windows explorer just like FTP in our web hosting servers.
After we had our wordpress extract the source into the htdocs folder, so that in the htdocs folder there will be a new folder named wordpress, open the wordpress folder and open the file wp-config-sample.php using notepad (or use a text editor). We just need to modify the 3 lines in this file, ie; DB_NAME, DB_USER and DB_PASSWORD which in this example a row I've with Wordpress (for DB_NAME), root (for DB_USER) and DB_PASSWORD not need the insert .. When finished, then save the modified file with the name of wp-config.php.
After that, we open the browser and write the following address in the address bar it: http://localhost/wordpress/wp-admin.php/install.php and follow these installation wordpress installation according to existing guidelines. After installation is complete, then we have wordpress blog ready for use. And address access to which is the address: http://localhost/wordpress/
 After a successful installation will display page sperti above please enter your username with a password on the next page.
 To further kllik Well Log In da start to berinspirasi without 24-hour nternet connection.
Hopefully useful ...
Thanks


0 Comment:
Post a Comment
HARI INI ADALAH WAKTU TERBAIK DARI PADA WKTU YANG TELAH BERLALU MAUPUN WAKTU YANG BELUM DATANG