20 April 2009

Facebook

Facebook is a Social Network website launched on February 4, 2004 and was founded by Mark Zuckerberg, a Harvard graduate and former Ardsley High School student. Many advantages are offered here, among others: Fellow Facebook users can instantly chat to without memaka ria such as Yahoo Messenger software. This is a standard feature embedded in Facebook (located on the right below). With Facebook,
sesusah not add friends on Friendster. Enough with the Facebook account memverikasi add friends as easy as turning the palm of the hand.
Behind the white side of Facebook there are some adverse effects companies, offices (from swata or state agencies), universities, etc.. Facebook users bnyaknya make people forget the job or duty to an employee, private sector employees, civil servants, even for a student or students who often do not miss open facebook when internetan, maybe this is the risk of technological advances, especially virtual world technology. Not only that indirectly, this progress can change one's lifestyle just imagine waking the sleeping malem sempet2nya when one is able to write what he had in mind or condition of the person with entengnya time, even a married man / beristripun able ngetikkan 'g can boo ': x, funny: r kalo emang wish those words in spoken to the husband / wife even more beautiful you what else was malem so. : D
Temen temen should be the positive side of all the technological advances that we feel for this let us not be complacent with where technology whose main purpose is to build the progress of mankind in an instant but in the end result malh intellectual destroy someone.
Hope can be a reflection
Keep Spirit!!!
Next Information....

13 April 2009

Instalasi Wordpress

Wordpress Offline Installation is extremely important for bloggers who do not have internet connection for 24 hours straight, which when needed can be connected directly. With these limitations have, then we really need a wordpress offline that can accommodate all the aspirations of blogging activities. As a means of preparing the post until the experiment materials such as template editing, edit the plugin, until the impromptu projects that I have to do with wordpress. If you want a little effort and a form of computer facilities at home, wordpress offline can easily be owned by exactly the same function compared with wordpress online, only this one will not be seen by people from the outside world.

Initial steps to install wordpress on local host (wordpress offline) is to provide surce we need for the installation process. Namely xampp installer packages and wordpress 2.7.1 (or newer)
Installing XAMPP
After our Wordpress XAMPP and download we begin to enter the installation (note: I happened to do this installation using Intel-based PCs using Windows XP). Open and install xampp installation package, and specify the drive where we will install it
XAMPP Control Panel
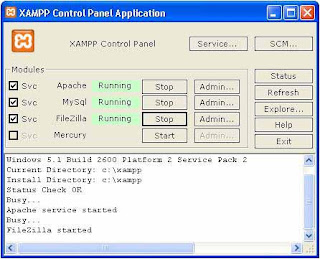
After installation is complete proes, then start it is XAMPP. Once XCAMPP run and have open, press the start button to start the Apache and MySQL service (the start of each located right next to peunjuk Apache and MySQL) and wait until the writings of 'Running' turns green.

Creating Database for WordPress
After we configure our MySQL security settings, so we now can begin to create the MySQL database that will be used for WordPress via PHPMyAdmin interface. Go through the sidebar XAMPP and make a new database, for example below I named the new database with the name of wordpress.


Installing WordPress
Now we will begin to go to configure our WordPress to the localhost. We begin by making ekstract. Zip file of our Wordpress existing htdocs folder inside the XAMPP folder which we have been installed at the beginning (open using windows explorer). Htdocs folder as public_html function if we use the web hosting server. And we think the windows explorer just like FTP in our web hosting servers.
After we had our wordpress extract the source into the htdocs folder, so that in the htdocs folder there will be a new folder named wordpress, open the wordpress folder and open the file wp-config-sample.php using notepad (or use a text editor). We just need to modify the 3 lines in this file, ie; DB_NAME, DB_USER and DB_PASSWORD which in this example a row I've with Wordpress (for DB_NAME), root (for DB_USER) and DB_PASSWORD not need the insert .. When finished, then save the modified file with the name of wp-config.php.
After that, we open the browser and write the following address in the address bar it: http://localhost/wordpress/wp-admin.php/install.php and follow these installation wordpress installation according to existing guidelines. After installation is complete, then we have wordpress blog ready for use. And address access to which is the address: http://localhost/wordpress/


Click on Install Wordpress
After a successful installation will display page sperti above please enter your username with a password on the next page.To further kllik Well Log In da start to berinspirasi without 24-hour nternet connection.
Hopefully useful ...
Thanks


Next Information....

22 February 2009

Unique way of Rapidshare Downloads

Aloow ... longer present after the lye ya incredible busyness can finally post is also to disseminate information to friends who need heheee ok .. we went straight to the topic this time I will discuss Rapidshare Plus-plus apa tuh? Rapidshare Plus-plus is a service to download the file is on RapidShare. for temen-temen a hobby download would have never felt what it feels like a free download rapidshare. Should be a matter of time when I can download anything else if the network was busy right?. Well there ya tool to overcome it all who knows wrote a friend interested.
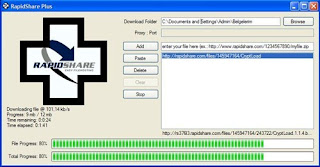
See Figure below

The first appears you can copy the url of rapidshare would be downloaded as much as possible.

There is an automatic feature RapidShare file downloader Rapidshare plus the

1) You can Add / Remove the Link Download File

2) You can add the proxy server settings

3) Start or Stop Download Process (No Resume Option yet available)

4) The progress and download files through the progress bar

5) Time Time passed and the Left

6) Event Download Speed

How friends interested? If you want to download the application monggo download it here. Until here used tricks and tips from my good luck with your friend. Hopefully this article useful and beneficial for the park. Do not forget to give comment to this article in order to have feedback from authors and readers.
Next Information....

08 February 2009

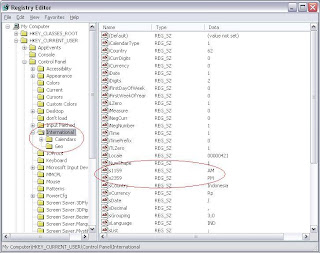
Changing Time AM and PM through Regedit

At this opportunity I will provide information regarding REGEDIT. Well now this blog will explore How to Change the Time AM and PM in Windows.

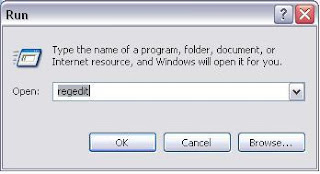
Immediately, we solve the problem: D click Start on Computers friend Start-Run or how quickly press Win + R then
dialog box will appear as below.


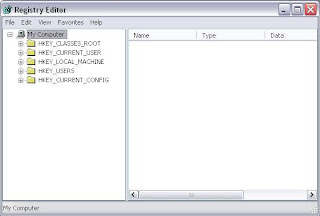
Type REGEDIT and then type the following at the click Enter a dialog box will appear like this again.

Search Folders HKEY_CURRENT_USER / Control Panel / International after that click and change the text s1159 AM by morning. s2359 click and change the text PM by SORE. If dizziness: # See the picture below:).
Change the box to the right see the text file to change s1159 AM with morning and change the text file s2359 AM by SORE. Once everything is set up or restart the computer in the fox friend Allah willing, able. Gud Luck: z

Salam Semangat!!!
by : wordpresstestsite

Next Information....

05 February 2009

Shutdown Client In Windows XP

Windows XP menyediakan satu opsi “shutdown tools” yang digunakan untuk remote shutdown, log off dan restart dari satu komputer kepada semua komputer yang ada dalam jaringan tersebut :) . Jika temen-temen suatu ketika mengendali banyak komputer, hal ini Windows XP provides an option "shutdown tools" used for remote shutdown, log off and restart from one computer to all computers in the network:). If temen-temen a while to control multiple computers, this is very very useful to you, because you do not need to turn off the computer one by one from every pc there, but no means jg for fun ngerjain other people: D. to do is turn off the computer using only 1 computer course, it is not possible today really versatile manual kok: r, all the remote control pake dunk!!. Regulations that need a simple note, among others:

1. Make sure you log in to the computer using an administrator account,
2. Make sure your computer has a network and connected with other networks,
3. Run Command Prompt and type "shutdown-i" click ok or enter,
4. Then will appear "Remote Shutdown Dialog" as below picture below,
2. In the menu "add" enter the IP or computer name that will be shutdown,
3. Then select the option on the menu "what do you want these computers to do" and select menu shutdown,
4. If you want to give time to the users before you make your check on the action menu "warm users of the action" and type in how long you will turn off the computer (in seconds),
5. In the option menu select "Other (Planned)",
6. Give comments if necessary to Box "comment",
7. Last time, please press the "OK" enter.

so that I can tell there kukuranga please reply our understandable both to learn and if there is more please return it: r, may be useful for personal interest, the public .. : d
salam semangat!!!!


Next Information....

03 February 2009

How To Make Image GIF (Animation)

Ever see a picture or a motion picture rather changing ..
GIF (Graphics Interchange Format) is one of the format used. There are several characteristics of the GIF image formats;

* Able to deliver the maximum 256 colors for GIF format uses 8-bit for each pixelnya.
* Compress images with lossless nature
* Supports transparent colors and simple animation

Format GIF or animated GIF called first introduced by CompuServe in 1987.
Below is an example of a simple GIF image I ever made;


My friends are interested in it!
How do I create one??
How to create a GIF image or animated GIF g hard-very hard to reply any intention and effort: r (halah..) Who first provided the tools needed to temen,
among others (for making the first image);

* Provide Adobe Photoshop (for creating PNG image files, or JPG)
* Create a JPG image 2 as the size below 100 x 100 px;

  • Sediakan Adobe Fireworks,Create New Fireworks Documents(PNG) dengan ukuran canvas 100 x 100 px (sesuai gambar sebelumnya yang kita buat);
    To keep in mind;
    the Optimized and Align to Optimize make sure the save settingnya "Animated GIF WebSnap 128" and the Export File format "Animated GIFs"#
  • Adding a Frame (this time we just need to add 1 frame) and Import images on the worksheet,
    right-click on the "Pages and Layers and Frames and History" and then select Add Frames and 1 karna inser1kan we only need 2 Frame.
    Right-click on the worksheet select Import (CTRL + R) enter the first image that has been provided (make sure the "Pages and Layers and Frames and History" we select Frame 1), next to the "Pages and Layers and Frames and History" select Frame 2 we treat the same as what happened on Frame 1 but we importnya the 2nd picture.
  • Delay Frame setting, we are setting delays each picture in each frame
    50 in the same frame delay means 50/100 second or half a second, so the image will alternate every 0.5
  • Finally we export project we have made, on the menu bar choose File - Export ... or "Ctrl + Shift + R"
The way above is how I pake, to temen2 who do not have Adobe Photoshop or Adobe Fireworks, I have other ways of Visitors, but the files we import a limited cuman 10 files, but kok kalo dah enough just to make a kind of slide show pictures: Ni D I love how the next:);
  1. Kita berkunjung here,
  2. Click the "Browse" and select a picture of his which wrote the've been in the computer disiapin temen-temen:). vote one aja dulu ya ': D. click "open"
  3. Next repeat again to enter to the 2nd and so on up to 10 images. Karna this site can only serve 10 files aja,: o kalo images more than 10 tutorials that follow the first course was:),
  4. At the bottom of the file in the browse've been on the site there are several columns. column contains one option (SIZE) the size of the image that is generated. Now the other option column (SPEED) its velocity delay.
  5. Click Continue on the bottom corner,
  6. Wait a minute and appeared process GIF images that have been in his message along with html code as well. :): D
Are you interested to try it out...!!!!!????
Next Information....

02 February 2009

Jaga Makam

Salam semangat temen-temen, nie aku lg pengen cerita liburan UAS ,pengalaman pertamaku nie tengah malem jaga kuburan(makam) kebayang g? :t tapi seru juga kemarin tuch awalnya mau silaturrahmi ketampat temen karna alasan biasa anak kos2an bila di akhir bulan ceritanya kan paling jg begitu-begitu aja :D nah waktu nginep dirumah temenku dikawasan kaki gunung merapi (nampaknya sie),di hari keduanya tuch aku diajaknya keluar jaga makam(huffff... :o ) hehe,, kl g lupa tuch jam 9 pm tuch aku keluarnya disana kita kagak sendirian lah tentunya,tp sempat malm tu kepikiran g salah tuch keluarga almarhum yang harusnya dapat santunan kok malah nyediain makanan(jajan) untuk yang jaga atau istilah jawanya sambatan.. aku percaya sie kl para warga disana tuch ngelakuinnya ikhlas untuk jaga makam selama 7 hari malah katanya dulu da yang dijagain selama 40 hari :f owh kira2 keluarga almarhum ngeluarin dana berapa iya?? :D
Kenapa iya makamnya harus dijagain?????
da yang pengen ganggu kah..?
Pa da yang pengen ngikut ya?? :o :r

Ternyata da alasan lain mengapa kuburan tuch harus dijaga,,katanya sie kalo orang yang meninggalnya pada hari selasa kliwon atau jumat kliwon tuch,ada yang ngincar jasadnya entah untuk apa gitu ,kok ngeri jg aku ngedengernya seperti di TV-TV kaya cerita di Bioskop gitu :D pernah lliat filmnya dewi persik kagak? nah ceritanya tuch tak pikir-pikir mirip jg :o .
Tahu g?? (jelasnya g tahu... :D ) yawdah aku kasih tahu lagi,
gini lho pertama dateng kemakam kan g da perasaan takut ato gimana-mana,tapi pas dah jam 1 am pas minuman sama makanan menipis jan jd g da temen mulut untuk ngobrol nah pengen pulang,pas ngeberesin gelas-gelas ma piring-piring tiba da something yang jatuh bug...(kaget,takut... :y )tmen ku sebernya takut tapi sok cuek "ahh cuma kelapa" tp pas pulang nya gaya berjalannya yang agak cepet tuch nandaain kl dia ketakutan coz jalan pulangnya tuch sumber benda yang jatuh tadi... :r
ni semata-mata untuk pengalaman aja
Salam Semangat!!
Next Information....

31 January 2009

hacking password of windows xp

For my friends who lost passwords, forgotten passwords, or emang deliberately forget Windows XP quiet aja:) .., the effort you can do to get back even to get a password of your friends though: D,, Starting from seeing password or direct reset your password. Various tools can be used among other temen2; OPH Crack. DreampackPL, PWDdump, Change Password, etc.. If you want to immediately reset password windows XP which has been forgotten, so you can get into windows temen2 or can directly use windowsnya (this only if you can enter your windows, or can also use the help of BartPE) then you can copy the hash that stores password information and then you first save after that you can read the meaning of this hash file with the help of john-john-386.exe or mmx.exe dreampackPL, with this tool you can get into windows without having to know the password, no need to change the password or the like. So, temen2 tuch only have to replace "sfcfiles.dll" contained in the folder "Windows/System32" with dreampackPL file and then rename it to "sfcfiles.dll". To be able to replace you can do it through dos can also be through the recovery console or WinXP Boot CD using the CD / DVD mini-Windows XP. These tools can be run through the CD / DVD boot. But unfortunately for the download file size is too big for those of you who do not use fast internet connection, but for how simple it can kerental temen temen kok: D, ever so little info for more shall be in check with the search engines.

* Attention is simply an information apologize if there are problems if used on activities that harm other people into their dependents

Next Information....

29 January 2009

Maximizing Bandwidth

How to speed up internet connection?
That word is often in question in anyone's mind by the greedy or greedy with the virtual world .. Here
I start to tell interesting tips to maximize our banwidth,,
I hope these tips useful for homeland Indonesia,, =))
to the point aja ... please be prepared prior devices, among others;


  • set of the PC (laptop is fine)
  • a set of Windows OS XP sp2
  • pray,,,( :D )
Next Step;

1. Click Start, Run then type "gpedit.msc" (no quotes used)


2. In the computer configuration - administrative
template - click Network.


3. Click QoS packet scheduler - Double Click on
Limit Reservable Bandwidth.


4. Click ENABLED Reservable settingannya bandwidth and change to 0 (zero)% after that Click Apply and click OK. Restart your computer


good luck!!

Next Information....

25 January 2009

Pengenalan Registry

Sebelum :) ngobrol banyak tentang Registry .
Akan saya perkenalkan terlebih dahulu ,apa itu REGISTRY ?>>>
Registry merupakan sebuah basis data yang disusun secara hirarkis yang mengandung informasi mengenai konfigurasi sebuah sistem, antara lain;

  • perangkat keras
  • perangkat lunak
  • asosiasi ekstensi berkas dengan aplikasinya, hingga
  • preferensi pengguna (user).
Registry memiliki struktur yang mirip dengan struktur direktori dalam sistem berkas. Registry jg dapat diakses dengan menggunakan
sintaksis yang sama dengan cara mengakses sistem berkas, dengan menggunakan karakter garis miring terbalik(backslash) untuk menandakan tingkatan hirarkis. Susunannya adalah seperti \\ sebagai contoh,
My Computer\HKEY_CURRENT_USER\Software\Yahoo\..

Daftar Anak Pohon Registry
Registry Windows memiliki berberapa anak pohon berikut,yang disusun secara
hirarkies dengan My Computer sebagai Root-Directory nya;
  • HKEY_CLASSES_ROOT
    Anak pohon HKEY_CLASSES_ROOT atau bisa disebutnya HKCR mengandung dua jenis data,yakni;
    1. Data yang mengasosiasikan jenis berkas (dilihat dari ekstensinya atau kelasnya) dengan program yang dapat membukannya. Subkunci jenis berkas di dalam HKEY_CLASSES_ROOT memiliki nama yang sama dengan ekstensi nama berkas, seperti halnya .txt, .exe, dan lain-lain. Asosiasi jenis berkas ini disimpan di dalam registry, tapi disarankan untuk menggunakan Folder Options->File Types jika memang hendak mengubahnya,
    2. Data konfigurasi untuk objek-objek Object Linking and Embedding (OLE)/Component Object Model (COM).
  • HKEY_LOCAL_MACHINE
    atau biasa disingkat HKLM,merupakan sebuah tempat penyimpanan untuk konfigurasi sistem bersangkutan, yang terdiri atas perangkat keras dengan perangkat lunak. Semua yang terdapat dalam anak pohon ini diaplikasikan kepada semua pengguna.
  • HKEY_CURRENT_USER
    ato biasa dipanggilnya HKCU, merupakan sebuah tenpat penyimpanan untuk konfigurasi yang dimiliki oleh pengguna yang sedang melakukan logon, yang menyimpan informasi mengenai konfigurasi preferensi pengguna (konfiguarasi desktop,warna, dan konfigurasi lainnya yang setiap pengguna dapat melakukan kostumisasi terhadapnya).
  • HKEY_USERS
    atau singkatnya HKU, merupakan tempat penyimpanan untuk konfigurasi setiap pengguna yang terdaftar di dalam komputer yang bersangkutan. Setiap anak kunci dari anak pohon diidentifikasi dengan menggunakan nomor Security Identifier(SID) jangan mengartikan superman is dead!!. Ketika pengguna melakukan logon, SID yang cocok akan dimuat ke dalam anak pohon.
  • HKEY_CURRENT_CONFIG
    sering disebutnya HKCC, merupakan tempat penyimpanan untuk konfigurasi perangkat keras dan sistem operasi yang sedang digunakan pada saat itu, yang diperoleh pada saat booting dilakukan. Informasi yang disimpan disini bersifat volatil dan tidak disimpan secara permanen kedalam berkas penampung registry, tapi akan selalu dibuat setiap kali proses booting dilakukan.
Catatan : HKEY di dalam registry Windows,merupakan singkatan terhadap kata " Handle to Key "
Ini saya tulis menurut yang saya dapat dari perkuliahan, untu lebih detilnya bisa lewat komentar,
Untuk tahu lebih detilnya lagi silahkan klik disini.
salam Semangat!!!
Next Information....

21 January 2009

Membuat Alert Pada Blogger

Temen-temen pengen pengunjung blog kita terpukau dengan ALERT seperti waktu temen2 klik di blog ini tentunya blog kita akan kelihatan;
1. Menarik,
2. Kreative,
3. Sopan Santun tentunya,kalo ada ucapan sapaan yang di tujukan pada setiap pengunjung!
contoh; WELCOME TO WHITE-BLACK INFORMATION


Untuk cara membuat

tampilan seperti diatas tidak mudah tentunya (untuk yang pemalas untuk mencobanya tentunya)

Pertama kita harus memiliki account blogger dulu tentunya :))
login dengan ID kita masing-masing;

Sekarang saatnya kita coding,(halah... sok programer)
Searching "< /head>"
- kita datangi tuch Tata Letak
- lanjutnnya ke Edit HTML
- Untuk mempercepat searching kata yang kita inginkan pada menu edit klik Find(Ctrl + F)
"untuk Mozilla Web Browser" terus masukkan saja keywordnya "< /head>"
- Next,kita tambah kan sedikit javascript diatas nya ,kalau kagak salah punya zen seperti ni;

remember!
perlu diingat WELCOME TO WHITE-BLACK INFORMATION,boleh temen-temen ganti sesuka hati.

Silahkan gunakan kata-kata yang ramah dan menarik agar pengunjung pun nyaman disetiap kunjungannya. OK

Salam SEMANGAT!!

Next Information....

19 January 2009

Melakukan Overclocking Melalui Bios

Overclock adalah istilah dalam teknologi infomasi dimana mengarah pada cara untuk meningkatkan performa suatu perangkat menjadi lebih tinggi. Overclock biasanya dilakukan para pengguna PC untuk memaksa komputer bekerja diatas kemampuan standard.


Cara Overclock(processor);
ada banyak cara yang bisa dilakukan untuk melakukan Overclocking salah satunya melalui bios,kita dapat mengatur frekwensi processor ketingkat lebih tinggi pada nilai default processor. Kecepatan processor default adalah hasil perkalian multiplier dan FSB (Front Side Bus). Jadi gambarannya
kalo kita memiliki processor dengan 2,0 GHz untuk meningkatkan kecepatannya kita masuk ke BIOS lalu cari menu Frequency/Voltage ontrol, secara perlahan kita naikkan kecepatan (sekitar 5 MHz)lalu uji kestabilan dengan program SiSoft, Sandra,SuperPi,atau 3D Mark. Bila sistem tadak hang,maka naikkan lagi 5MHz. Warning! tidak semua mainboard menyediakan menu untuk merubah frekwensi,pada merk-merk tertentu seperti ASUS,MSi,Gigabite,dll yang biasanya memiliki bios yang cukup luas untuk melakukan Overclock.

Perlu diperhatikan temen-temen Overclocking PC ini selain membuat perangkat sistem tidak stabil,dapat membuat kerusakan pada perangkat keras,terutama, hardisk,mainboard,dan processor. Tapi santai aja,sekarang tuch zaman dah lain sekarang banyak perangkat keras yang dibuat fabrikasi yang sudah handal untuk keperluas Overclocking,temen-temen tinggal ketoko komputer bilang saja pada pelayan toko hardware apa yang support untuk dilakukannya Overclocking.

Cara Melindungi hardware yang di Overclock;
Kerusakan hardware karena di Overclock terutama disebabkan oleh panas yang berlebih untuk menghindarinya banyak cara untuk mengakalinya misal memperbaiki sistem aliran udara dalam casing, memperbaiki heatsink CPU/CHIPSET?VGA dengan cara Lapping atau bahkan menggantinya dengan pendingin berkualitas yang sekarang dijual banyak di jual di toko-toko komputer,misal;Water Cooling,
Freon,sanpai yang extrim menggunakan Bong dan Dry Ice.


Next Information....

17 January 2009

Memasang Favicon pada Website atau Webpage

Favicon adalah kependekan dari Favorite Icon namun dalam hal ini icon yang dimaksud adalah icon yang digunakan pada atau yang dipasang pada website atau webpage,

contoh:


untuk pembuatannya sangat mudah,kita siapkan saja file *.ico terus kita upload saja pada hostingan gambar,selesai.
hehe bercanda
ikuti aja petunjuk yang saya berikan;

  1. Siap kan file *.jpg (misal; WB.jpg) sebenarnya kita bisa membuat file *.ico menggunakan IconCool software tapi sekarang lanjutkan untuk manualnya saja(1)
  2. Selanjutnya kita sulap file WB.jpg tersebut menjadi WB.ico ,kali ini kita membutuhkan icon generator untuk itu mari kita berkunjung ke favicongenerator.(2)

  3. klik pada Choose File untuk mencari file WB.jpg yang telah kita persiapkan sebelumnya pada komputer.(3)
  4. Kemudian kita klik pada tombol Generate Favicon!(4)
  5. Kita save pada komputer(5)
  6. Langkah selanjutnya kita upload file gambar WB.ico yang telah kita simpan sebelumnya ke hostingan gambar,misal photobucket,atau ke yahoo!geocities ( 6)
  7. Sekarang saya anggap telah mendapatkan direct link nya(7)
    http://www.geocities.com/chessy_yyn/WB.ico
  8. Selanjutnya kita taruh alamat URL diatas pada(8)

  9. Langkah selanjutnya login pada blogger dengan ID temen sendiri(9)
  10. Klik Tata Letak(10)
  11. Klik Edit HTML(11)
  12. Cari kode </head>(12)
  13. Taruh kode pada petunjuk no.8 diatas kode </head>(13)
  14. SIMPAN TEMPLATE.(14)
Sekarang temen2 sudah mempunyai favicon pada URL blog.
** Salam Semangat!
** Untuk yang tertarik dengan software
IconCool bisa kirimkan lewat email
Next Information....

Tutorial Membuat Blog di Blogger

Bermain blog itu menyenangkan bahkan untuk menghabiskan waktu kosong,dari pada g belajar
ato yang tak punya kerjaan,dengan ngblog kita dapat ngungkapin semua yang kita rasakan
yang kita pikirkan,caranya mudah saja.
Lanjut aja kita konek jaringan buka web browser kemudian ketikkan blogger.com kemudian enter
atau klik saja disini. kemudian tampil page seperti di bawah ini;

1. klik pada CIPTAKAN BLOG ANDA


2. Kita mengisi form untuk menciptakan sebuah akun dimana kita
sudah memiliki email sebelumnya (email bebas:yahoo,gmail,dll)
pasword : .....
nama tampilan: ... (nama untuk tiap kita posting)
terus jangan lupa sebelum kita klik LANJUTKAN beri tanda centang pada penerimaan persyaratan.
sekarang tekan LANJUTKAN


3. Pemberian nama blog yang akan kita buat
kita masukkan saja
judul blog : ......
misal: white black information
alamatblog : .....
misal: http://shareinformation-zein.blogspot.com/

terus klik LANJUTKAN


4. Kita kita ditawari memilih template awal untuk blog kita
pilih saja template yang temen2 suka.
kalo dah memilih bajunya,
kita lanjutkan stage selanjutnya
klik LANJUTKAN


5. kalo sudah sampe disini misi kita telah selesai
untuk mengisi (posting) pada blog yang telah temen2 buat
seperti di awal2 tadi klik LANJUTKAN


semoga tutorial ini membantu temen-temen
GOOD LUCK!
GO BLOG-ging yuk,SEMANGAT!!!!!

Next Information....

16 January 2009

Menyembunyikan File Di Balik Sebuah Gambar

Pertama-tama sediakan file( *.*)
missal: percobaan.rar
kemudian file gambarnya
contoh : zaini.jpg
kedua file tersebut taruhlah pada my documents(misalkan)
sekarang cara ngejadiin satu file nya…(file *.rar tersebut dengan *.jpg nya)
Masuk ke Commands Prompt

C:\Documents and Setting\zaini>cd My Documents
–enter

C:\Documents and Setting\zaini\My Documents>copy /b zaini.jpg + percobaan.rar zaini2.jpg

Dah deh sekarang coba you buka My Documents,da gambar zaini2.jpg g?
-- zaini2.jpg merupakan hasilnya untuk penamaannya terserah creatornya

Kl dah ada berarti compilasinya berhasil.

Tapi jangan senang dl itu ru 90% sekarang rubah extensi dari file *.jpg yang kita buat menjadi *.rar

(file yang kita sembunyikan),kalo file *.rar tersebut dapat dibuka berarti project kita berhasil.^_^

Asyikkan!!! Sekarang tinggal makan-makannya.

**Warning

Ilmu ini bukan semata-mata untuk menyembunyikan file yang merugikan pengguna windows (virus)

File yang disembunyikan sizenya terbatas tidak semua ukuran file dapat di putar balikkan fakta(halah).


Next Information....

Setting Variable Path

setting variable path,sebelum kita bermain eksekusi di DOS disarankan
melakukan setting pada variable path agar system secara otomatis mencari file yang diperlukan.
Dalam hal ini,path adalah drive dan direktori dimana java.exe , javac.exe dan aplikasi
pendukung lain ditempatkan.
Path dapat dimasukkan dari perintah baris perintah MS DOS;
SET PATH=[drive:];[path];[drive:];[path];..
contoh => C:\Program Files\Java\jdk1.6.0_02\bin

untuk di Windows caranya ,klik kanan pada "My Computer" lalu klik "properties"
kemudian klik "Advance"
setelah itu klik "Environment Variable" lalu pada System Variable(box bawah) pilih "Path"
lalu klik "edit"
kemudian pada "Variable Value" tambahkan path dimana direktori binnya Java
diletakkan namun sebelumnya tambahkan pemisah path ; lalu klik OK.
Setelah instalasi selesai,kita lanjutkan pembuktian dari apa yang telah kita
perbuat sebelumnya sudah berjalan denga benar atau tidak dengan ikuti perintah
perintah berikut ini;
1. Buka command promt (WINDOWS -> RUN -> CMD)
2. Setelah dialog command promt sudah ada dilayar coba ketikkan: java
(testing untuk menjalankan java pada command prompt)

3. Kemudian ketika lagi: javac
(testing untuk menjalankan javac pada command prompt.
bila keluar cara penggunaan java,berarti berhasil)
4. Setelah itu ketikkan kembali: java -version
(untuk mengetahui versi java yang diinstalasi)


Next Information....

Login Yahoo! Messenger lebih dari 1 ID

Untuk tipe orang orang yang serakah biasanya menginginkan sesuatu lebih dari satu,sepertihalnya alamat email,dalam hal ini,didalam dunia chating seseorang menggunakannya untuk kepentingan pribadi baik untuk hal yang baik maupun yang kurang baik,, No handphone aja bisa lebih dari satu(loch kok kemana2)..

Next =>>

ada baiknya sebelum penyetingan kita instalasi YM dulu terserah temen2 pake seri berapa..


Next =>>

caranya :

1. Buka Registry Editor
* run - tuliskan regedit

2. My Computer

3. HKEY_CURRENT_USER

4. Software

5. Yahoo

6. pager

7. Test

*kita tambah kan DWORD Value dengan;

- nama : Plural

- Value data : 1

- Base : Hexadecimal


Next Information....